There is only 1 required variable and a few optionals, which are set by modifying the FlashVars property in the Flash Object on the web page.
Required variable:
file=filename
--- path to file
if not given, it will attempt to load 'test.jpg'
optional variables:
borderWidth=nn
--- border around main image. Useful for zooming, so that user can see edges better. Defaults to 12 pixels.
glassSize=n
--- initial size of magnifying glass. Valid values are 1 through 4 (for one-third-of-smallest-dimension to full-size glass). Defaults to size 2 (half).
-- I scrapped size 0. Values outside the range 1 to 4 are clipped to the range.
initialZoomSize=NN
--- initial zoom level (% of pixels in zoomed image - i.e. 100 shows all pixels in zoomed image - does not affect main image). Defaults to 100. Do NOT put in % sign as this is a reserved symbol and wrecks the next character in FlashVars OR initialZoomSize=Nx
Set initial Zoom Size by magnification level (as shown on slider) instead of %. 'x' must be the character immediately after the number.
maxZoomSize=NN
--- maximum allowed zoom. Defaults to 200 - i.e. double full-size of zoomed image (will be slightly blurry). ORmaxZoomSize=Nx
Set Max Zoom Size by magnification level (as shown on slider) instead of %. 'x' must be the character immediately after the number.
targetColour=#RRGGBB
Colour of target. You may need to change it from the default red if you're zooming into a reddish thing. 'u' in 'targetColour' is optional, as is '#' before hex colour value.
file2=filename
--- use a different image inside magnifying glass instead of just zooming the main image.
This 'reveals' new information as well as zooming. Reveal example.
Notes
initial Zoom % settings are different from the magnification-level shown when running... but the designer should be thinking about the resolution of the images and the viewing user should be more interested in the current magnification level.
you can stick units after values if you like (% or px or whatever) - they are ignored.
I haven't tested it, but swf files may be used instead of (non-progressive) jpegs.
e.g. A creative person could make a nature-scene where zooming in shows you the fish jumping in the river, etc.
setting the bgcolor in the flash object changes the border colour around the image.
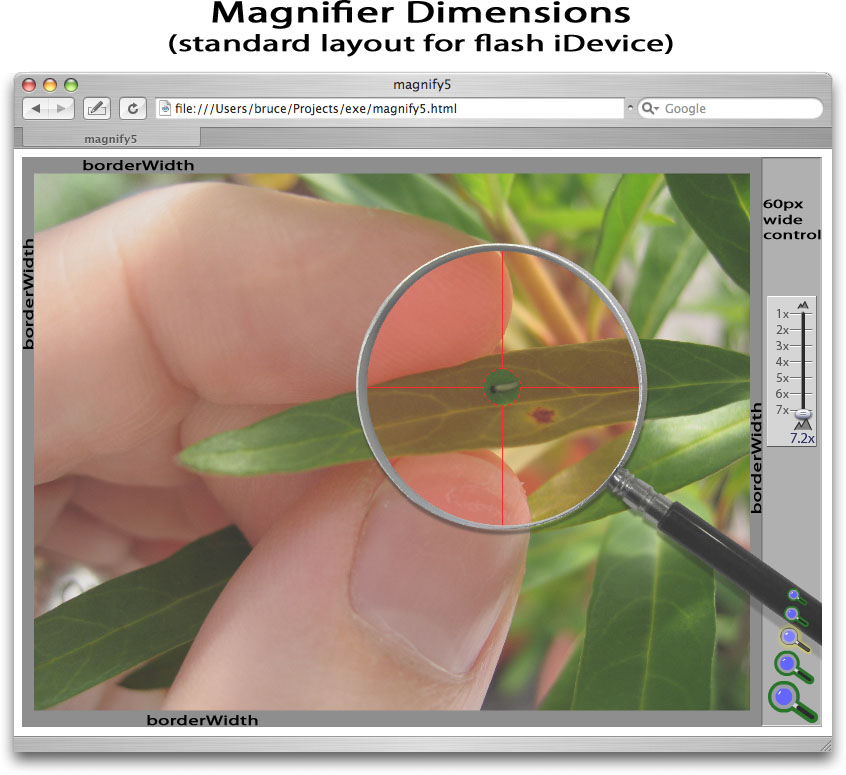
For an image sized IW by IH pixels, optimal sizes for the Flash object are:
n x IW + (2 x borderWidth) + 60 by n x IH + (2 x borderWidth)
If user chooses Flash iDevice width, optimal height can be calculated as:
FlashHeight = ((FlashWidth - (2 x borderWidth) - 60) / IW) x IH + (2 x borderWidth)
Notes:
If you know the image aspect ratio (e.g. 4x3), you can substitute these values for IW and IH.
User should be able to enter width or height and have other value auto-calculated (unless they 'unlock' the 2 dimensions and manually enter both values.
You could use 270 as minimum height, but if you do want to set height to <270 pixels, use small-size calculation below instead.
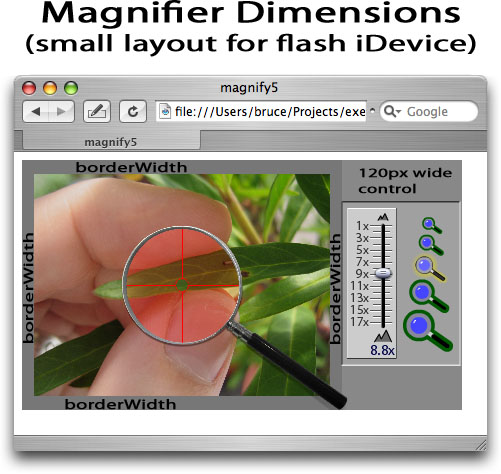
For an image sized IW by IH pixels, optimal sizes for the Flash object are:
n x IW + (2 x borderWidth) + 120 by n x IH + (2 x borderWidth)
If user chooses Flash iDevice width, optimal height can be calculated as:
FlashHeight = ((FlashWidth - (2 x borderWidth) - 120) / IW) x IH + (2 x borderWidth)
Notes:
If you calculate height is >=270, use standard calculation above instead.
It doesn't matter which calculation you do first, so I suggest doing the 'standard' one and then doing the small one if height is calculated as <270 pixels.
If main image is smaller than available space, it is shown at 100% (ie not scaled up) and borderWidth is increased to pad remaining space
Smallest valid width is 180 pixels
Smallest valid height is 160 pixels I changed the small/standard cutoff size from 300 to 270